Is icing really the cool solution for your injury? Let’s break it down for competitive athletes and recreational adult athletes who are grappling with pain or injury and questioning whether icing injuries is good or bad? The answer may surprise you.
The Icing Dilemma: Two Perspectives
Contrary to the pro-icing camp, another perspective emphasizes the importance of allowing the body’s natural healing process to unfold without interference. This viewpoint argues that ice disrupts the natural inflammatory stages necessary for optimal tissue healing.
The Argument For Icing: Quick Relief and Continuity
One school of thought advocates for icing injuries as a means to reduce pain and excessive inflammation. The ice allows athletes to continue their sports or therapeutic activities.
Proponents argue that the immediate application of ice can provide immediate relief, numbing the affected area and enabling athletes to push through discomfort. They believe that by constricting blood vessels, ice helps control swelling and prevents further damage.
Ken Vick, a high-performance director in elite sports, explains, “We do know that ice won’t speed up the healing of injuries. In fact, it probably slows healing down. However, it can be an effective tool for managing pain and inflammation in the acute stage of an injury. It gives athletes a chance to get in the game sooner or so they can do the rehab work to get back.”
The Argument Against Icing: Trusting the Body’s Healing Process
Supporters contend that inflammation is a vital part of the body’s innate response, bringing crucial nutrients and cells to the injured site for repair.
Dr. Gabe Mirkin, the physician who popularized the R.I.C.E. (Rest, Ice, Compression, Elevation) protocol, has revised his stance on using ice for injuries. He stated, “Coaches have used my ‘R.I.C.E.’ guideline for decades, but now it appears that both ice and complete rest may delay healing, instead of helping.”
The Reality: Context is Key
Now, before we plunge into the icy depths or entirely abandon the frosty ritual, it’s essential to understand the broader context. The decision to ice or not to ice hinges on individual circumstances, goals, and the nature of the injury itself. Let’s shed light on this nuanced reality.
Goal-Driven Approach: What Do You Seek?
When considering whether to ice an injury, it’s essential to identify your primary goal. If your utmost priority is to reduce pain and inflammation swiftly, allowing you to continue training or participating in competitions, then ice might offer a viable solution. This approach prioritizes immediate activity over optimal tissue healing.
On the other hand, if you have the luxury of time and rest, and your main objective is to achieve optimal tissue healing, then giving nature its course without relying heavily on ice might be the wiser choice. By allowing inflammation to progress naturally, you support the body’s intricate healing mechanisms, potentially leading to better long-term outcomes.
From his perspective working with athletes Vick advises, “Consider your goals and the demands of your sport or activities. If you need to be active in the short term, ice can provide temporary relief. However, if long-term tissue healing is paramount, be patient. Skip the ice and adopt a movement-based approach to let your body heal naturally.”
AND, Not OR
In cases of more significant injuries, such as Grade 2/3 sprains, strains, or fractures, it’s a good practice of using ice during the initial 2-3 days before transitioning to a rehabilitation phase without it. During this early stage, ice can play a beneficial role in reducing pain, swelling, and inflammation.
By applying ice intermittently for short periods, athletes can gain immediate relief and create a more favorable environment for the subsequent stages of rehabilitation.
However, after a few days the focus should shift towards active rehabilitation exercises and other modalities that promote tissue healing and functional recovery. This approach allows athletes to harness the benefits of ice during the acute phase while gradually shifting the focus to more dynamic and active interventions for long-term recovery.
Embracing a Balanced Perspective
While the debate over whether icing injuries is good or bad rages on, it’s crucial to keep perspective. Remember that sports medicine is a dynamic field, continuously evolving with new insights and research. As an athlete, you have the power to make informed decisions based on the best available evidence.
It’s important to seek guidance from qualified healthcare professionals who specialize in sports medicine. They can assess your injury’s unique characteristics, understand your goals, and provide personalized recommendations tailored to your needs.
And keep in mind that there are other strategies to reduce excessive or chronic inflammation. Pneumatic compression, red light therapy and dietary strategies can all be used as well without interfering with the healing process.
Remember the ultimate goal is to support your recovery and get back in the game stronger than before. So, stay informed, consult the experts, and listen to your body. By doing so, you’ll make the coolest decision for your injury journey.
Disclaimer: The information provided in this article is for educational purposes only.and It not be considered a substitute for professional medical advice. Always consult with a qualified healthcare professional or sports medicine specialist for personalized recommendations.
As a physical therapist specializing in sports rehabilitation, I often encounter questions and concerns regarding the safety and effectiveness of overhead shoulder exercises.
Today, I want to address these concerns and shed light on the importance of incorporating these exercises into your fitness routine. So let’s dive in!
The Power of Overhead Shoulder Exercises
Overhead lifting exercises, such as shoulder presses, pull-ups, and barbell snatches, have gained popularity among fitness enthusiasts and athletes alike. And for good reason!
They are fantastic for building muscle and strength in your shoulders, contributing to overall athletic performance.
Think about it – whether you’re reaching for something on a high shelf, loading your gear onto a roof rack, or hanging a picture frame, these daily activities often mimic the motion of an overhead press.
By incorporating overhead shoulder exercises, you can enhance your functional movement patterns and perform these activities with ease.
And its part of our design. Human shoulder complexes are designed to be able to function in a really big range of motion. That includes overhead.
Understanding the “It Depends” Factor
Now, let’s address the elephant in the room: the notion that overhead exercises are inherently bad or should be avoided. They are not.
However, there’s more to it.
Whether overhead exercises are suitable for you depends on a variety of factors. I want to emphasize that I am not advocating for blindly performing these exercises despite pain or shoulder issues.
Therefore, to answer this question, we need to take a more pragmatic approach and consider the bigger picture.
Mobility Matters
First and foremost, you must have adequate overhead mobility. Can you fully raise your arm overhead without arching your back, shrugging, or experiencing any discomfort?
If not, it’s crucial to address any mobility limitations before attempting overhead exercises.
This lack of mobility may stem from various areas, including the shoulder joint, the scapula-thoracic joint, or the thoracic spine. While many people focus on the shoulder itself, often the scapular muscles and lats are bigger culprits.
Additionally, muscular imbalances can also contribute to limited overhead mobility.
Remember, if you can’t lift your arm overhead comfortably, it’s best to work on improving your mobility before diving into overhead presses.
Stability is Key
Another critical factor is shoulder and spine stability. To handle the demands of overhead lifting, you need adequate stability in your shoulder girdle.
This stability is achieved through a strong foundation created by your upper back, scapular muscles, rotator cuff, and even your trunk and core.
Muscular imbalances and stability deficits are common issues that can impact the shoulder girdle, so it’s important to address these through appropriate exercises and training techniques.
Remember, the heavier the weight you lift, the more stability your shoulder girdle requires.
Mastering Load Management
In the pursuit of optimal shoulder health and performance, many enthusiasts overlook the importance of load management.
Intensity (weight)
volume (sets and repetitions)
frequency (how often)
Even with excellent mobility and stability, improper load management can lead to soreness and shoulder discomfort over time.
It’s crucial to find the right balance and avoid overwhelming your body’s capacity to recover. Remember, depending on your goals, you may not need to lift maximal loads to get the benefits.
Just like pitchers monitor their pitch counts to prevent overuse injuries, you must understand that pushing too hard or too frequently can hinder your long-term fitness and performance goals.
The Art of Exercise Modification and Scaling
When it comes to maintaining shoulder health in the long run, understanding exercise modification, regression, and scaling is paramount.
Understand, there is no one-size-fits-all approach.
Each individual may have unique limitations or restrictions that require adjustments. Fortunately, any functional movement pattern can be modified or scaled to achieve the same goal of building strength and improving fitness.
For example, if a barbell overhead press feels uncomfortable, consider using dumbbells or kettlebells instead to allow more freedom of movement. Additionally, the use of a landmine setup can be an excellent alternative when a full overhead position is not possible.
The key is to find overhead lifting variations or positions that work for you while minimizing stress on the shoulders.
Whether you’re dealing with mobility restrictions, recovering from an injury, or experiencing shoulder discomfort, modifying and scaling exercises can help you achieve success while reducing excessive tissue stress.
To ensure effective modifications, regressions, or scaling, it’s advisable to seek guidance from a knowledgeable healthcare professional or fitness expert who can tailor exercises to your specific needs.
Embracing a Mindset of Control
In conclusion, let’s revisit our initial question: Are overhead lifting exercises safe? The answer is a resounding yes.
However, we must acknowledge that individual circumstances and factors come into play. It’s essential to take ownership of our bodies and understand that the exercises themselves are not to blame.
Instead, poor mobility, stability, and training habits are the culprits behind potential issues. By addressing these areas and seeking professional guidance, you can take control of your body’s capabilities and unleash your full potential.
Remember, if you’re new to exercising or currently dealing with an injury, it’s always wise to consult a qualified healthcare provider who can offer personalized advice based on your unique situation.
So, embrace the benefits of overhead shoulder exercises, focus on improving mobility and stability, manage your training load wisely, and don’t hesitate to modify or scale exercises when needed.
With the right approach, you’ll be on your way to achieving optimal shoulder health, enhancing your athletic performance, and enjoying the benefits of a well-rounded fitness routine.
Expert Advice for Parents and Coaches of Young Athletes and Athletes
Shoulder injuries can be a common concern in sports that involve repetitive overhead movements.
However, by understanding the importance of scapular control, you can significantly reduce the risk of shoulder injuries. In this article, we will explore the role of scapular control and provide valuable tips to help prevent shoulder injuries.
Why Scapular Control Matters
The shoulder is a complex joint that allows for a wide range of motion. However, this mobility also makes it susceptible to injury, especially during sports that involve repetitive overhead movements like swimming, tennis, baseball, and volleyball.
The scapula, or shoulder blade, plays a crucial role in shoulder function and stability. It acts as a foundation for proper shoulder movement and helps distribute forces during athletic activities. Maintaining proper scapular control ensures that the shoulder joint operates smoothly and efficiently.
It is a foundation for proper movement and positions in overhead activities. If the shoulder blade is not rotating and elevating properly, there are consequences.
Overhead mechanics can be altered that impact performance and stress on the athlete’s body.
Compensations can occur in other body parts to get that arm overhead that contribute to impingement, tendonitis, and ligament strain.
Weakness or dysfunction in the muscles that control the scapula can lead to imbalances and increased stress on the shoulder joint, increasing the risk of injury. This is why scapular control is essential for preventing shoulder injuries and optimizing athletic performance.
Understanding Scapular Control
Scapular control refers to the ability to move and stabilize the shoulder blade effectively. It involves the coordination of several muscles, including the trapezius, serratus anterior, and rhomboids. These muscles work together to control scapular movement, positioning, and stability during sports activities.
The trapezius muscle helps retract, rotate and elevate the scapula
Serratus anterior muscle plays a crucial role in protracting and stabilizing the scapula against the rib cage.
The rhomboids assist in retracting and stabilizing the scapula.
Levator scapulae helps to rotate and elevate the scapula.
When these muscles work harmoniously, the scapula moves smoothly, allowing for optimal shoulder function and reducing the risk of injury.
However, if there is a muscle imbalance, weakness, or poor coordination, scapular dyskinesis can occur, leading to abnormal scapular movement patterns and an increased risk of shoulder injuries.
Tips for Improving Scapular Control
Now that we understand the importance of scapular control, let’s explore some practical tips to help improve scapular control and prevent shoulder injuries:
Warm-Up and Stretching
Begin every practice session or game with a proper warm-up routine to prepare the muscles for activity.Perform mobility exercises that target the shoulder, thoracic spine, and hips promoting flexibility and range of motion.Include exercises that activate the rotator cuff, scapular muscles, and the core.
Strengthening Exercises
Engage in specific exercises that target the muscles responsible for scapular control.
Include muscle that strengthen and integrate the scapular and shoulder muscles with the entire kinetic chain.
Technique Awareness
Emphasize the importance of proper technique and form during sports activities.
Sport coaches should provide guidance on sport specific mechanics so the athlete moves efficiently and safely.
Connected Training
Incorporate exercises that challenge the demands of the specific sport through the kinetic chain.
Engage in activities and exercises that challenge scapular control during whole body movements such as overhead kettlebell exercises and medicine ball throws.
Consult with Professionals
If there are concerns about scapular control or the risk of shoulder injuries, seek guidance from sports medicine professionals or physical therapists.They can assess and provide personalized exercises and strategies to address any scapular control issues and reduce the risk of injury.
Strengthening Exercises
This article focuses on strengthening the scapular muscles and connecting them to the kinetic chain. So, while mobility work and other areas need strengthening for overall performance and health, we’ll keep this limited to a few key exercises.
Strengthening Scapular Muscles with Resistance Bands
Resistance bands are an effective tool for targeting the scapular muscles through exercises such as Ys, Ts, and Ws. Let’s explore how to perform these exercises using resistance bands:
Ts: – Hold the band with an overhand grip, arms extended in front of you. – Begin by squeezing your shoulder blades together and pulling the band outwards, creating a T shape with your arms. – Maintain the contraction in your scapular muscles and control the band as you return to the starting position. – Aim for 2-3 sets of 10-15 repetitions.
Ys & As (Diagonals): – Hold the band with an overhand grip in front of body, one arm diagonally up and the other down. – Begin by squeezing your shoulder blades together diagonally and pulling the band outwards and upwards with one hand, and outwards and downwards with the other. – Maintain the contraction in your scapular muscles and control the band as you return to the starting position. – Aim for 2-3 sets of 10-15 repetitions of each diagonal or alternate.
Ws: – Hold the band with an overhand grip in front of body on one hand with the elbow at 90 degrees, the other arm other down. – Begin by externally rotating the shoulder moving the top hand up and out. – At the same time squeeze the scapula and move the upper back. – Maintain the contraction in your scapular muscles and control the band as you return to the starting position. – Aim for 2-3 sets of 10-15 repetitions of each diagonal or alternate.
Exercise Tips
When performing these exercises, keep the following tips in mind:
Focus on maintaining proper form throughout the movements.
Engage the scapular muscles by retracting and depressing the shoulder blades (…don’t let your shoulder come up by your ears).
Control the resistance band as you move through each exercise, avoiding jerky or rapid motions.
Perform the exercises in a slow and controlled manner to maximize their effectiveness.
Start with a lighter resistance band and gradually increase the intensity as your strength improves.
Incorporating Ys, Ts, and Ws exercises with resistance bands into your training routine can effectively target and strengthen the scapular muscles, promoting better shoulder mechanics and reducing the risk of shoulder injuries.
Strengthening the Serratus Anterior
The serratus anterior is a crucial muscle for scapular control and stability, playing a vital role in preventing shoulder injuries and optimizing athletic performance. Let’s explore some effective exercises that specifically target the serratus anterior:
Facing the Wall Slides with Thoracic Extension
This variation of wall slides not only strengthens the serratus anterior but also promotes thoracic (upper back) extension, further improving scapular control and mobility.
Stand facing a wall with your feet about shoulder-width apart.
Place your hands on the wall at shoulder height, slightly wider than shoulder-width apart.Keeping your arms straight, slowly slide your hands up the wall while maintaining contact with your palms and fingers.
As you slide your hands up, focus on protracting your shoulder blades (bringing them away from the spine) and maintaining a gentle squeeze between your shoulder blades.
At the top of the movement, actively extend your upper back by arching slightly backward.
Return to the starting position by sliding your hands back down the wall, maintaining control throughout the movement.
Perform several repetitions of this exercise.
Scapular Controlled Articular Rotations (CARs)
Scapular Controlled Articular Rotations are excellent exercises for improving the mobility, stability, and strength of the serratus anterior and other scapular stabilizers.
Stand tall with your arms extended forward at shoulder height, palms facing down.
Slowly rotate your shoulders in a circular motion, focusing on maintaining control and feeling the activation in your serratus anterior.
Perform clockwise and counterclockwise rotations for several repetitions.
Straight Arm Pushups
Straight arm pushups, also known as scapular pushups, specifically target the serratus anterior and promote scapular stability.
Start in a high plank position with your hands directly under your shoulders, arms fully extended, and body in a straight line.
Slowly lower yourself toward the ground while maintaining a stable scapula and keeping your arms straight.
Push back up to the starting position, focusing on protracting your shoulder blades and feeling the engagement in your serratus anterior.
Repeat for the desired number of repetitions.
Incorporate these exercises into your training routine will effectively target and strengthen the serratus anterior muscle, enhancing scapular control, stability, and reducing the risk of shoulder injuries.
Remember to perform the exercises with proper form and start with an appropriate intensity that challenges the
Connected Exercises Using a Kettlebell
In addition to the previously mentioned tips and exercises, incorporating kettlebell exercises can further enhance scapular control and shoulder stability. These are the most challenging because they coordinate more dynamic movements across more of the kinetic chain.
Kettlebells provide a unique training stimulus because of the “off-balance” design. Because of this, they challenge stability in the entire body, including the scapular muscles.
Here are some connected exercises using a kettlebell that can benefit athletes:
Turkish Get-Ups (TGU)
The Turkish Get-Up is a full-body exercise that promotes scapular stability and control throughout the movement.
Start by lying on your back while holding the kettlebell with a straight arm.
Gradually transition to a standing position while keeping the kettlebell overhead and maintaining a stable scapula.
Reverse the movement back to the starting position.
Windmills
Windmills target the shoulder stabilizers and promote scapular control through rotational and lateral movements.
Start with the kettlebell in one hand, raised overhead.Keep the arm extended and slowly hinge at the hips, lowering the opposite hand toward the ground.
Maintain a stable scapula and a neutral spine throughout the movement.
Return to the starting position and repeat on the other side.
Halo
The Halo exercise targets the muscles surrounding the shoulder girdle, including the scapular stabilizers.
Start by holding the kettlebell upside down by the horns in front of your chest.
Slowly move the kettlebell in a circular motion around your head, keeping the scapula stable and engaged.
Perform the movement in both clockwise and counterclockwise directions.
Bottoms-Up Presses
Bottoms-Up Presses challenge scapular control and shoulder stability by holding the kettlebell upside down.
Start with the kettlebell in a bottoms-up position, gripping the handle with your palm facing upward.
Press the kettlebell overhead while maintaining a stable scapula and controlling the kettlebell’s instability.
Lower the kettlebell under control and repeat for the desired number of repetitions.
Incorporating these kettlebell exercises into your training routine can further improve scapular control, shoulder stability, and overall athletic performance.
However, it is crucial to ensure proper technique and start with an appropriate kettlebell weight that allows for proper form and control.
TL:DR Summary
Remember, scapular control plays a significant role in preventing shoulder injuries among young athletes.
You can improve this through;
Proper mechanics in sports (i.e. throwing, serving, hitting, and swimming strokes)
Strengthening the scapular stabilizing muscles
Build better function in the scapular muscles through kettlebell exercises that “connect” them to the torso and kinetic chain.
By implementing these tips and exercises, athletes can enhance their scapular control, reduce the risk of shoulder injuries, and optimize their performance on and off the field.
Are you an athlete who loves sports like baseball, volleyball, or tennis? Are you a parent or coach of a young athlete involved in these overhead sports?
If so, it’s important to understand how to prevent shoulder injuries, as they are common in these activities. In this article, we will provide you with some valuable tips and insights to keep your shoulders healthy and strong.
Understanding the Causes of Shoulder Injuries
Shoulder injuries in overhead sports often occur due to a combination of factors. One crucial aspect is the capacity of the body to handle the demands placed on it.
When the forces generated during motion exceed what the body can handle, injuries can happen. Let’s dive into some key factors that contribute to shoulder injuries and how to address them.
Tissue Integrity: Keeping Your Ligaments and Muscles Strong
The strain on ligaments, like the ulnar collateral ligament in the elbow, can be too great for them to handle. This strain often occurs during specific phases of motion, such as the cocking phase and deceleration.
To maintain tissue integrity, it’s important to work on strengthening the surrounding muscles and improving flexibility. This can help alleviate stress on the ligaments and reduce the risk of injury.
Increasing capacity can be as important as managing load
Strength and Endurance: Building a Solid Foundation
Proper mechanics rely on sufficient strength and endurance in the muscles involved in overhead movements. Lack of strength, especially in eccentric strength, can lead to inefficient energy transfer and increased stress on the shoulder.
Gradually building strength and endurance in key muscle groups is essential. This can be achieved through targeted exercises and regular training. Remember, Rome wasn’t built in a day, and neither is a strong and healthy shoulder!
Recovery: Giving Your Body the Rest It Needs
Fatigue plays a significant role in reducing force capacity and increasing injury risk. Inadequate recovery time between practices, matches, or pitching outings can be detrimental.
It’s crucial to prioritize sufficient rest and recovery to allow your body to heal and recharge.
Coaches and parents should ensure that athletes have appropriate rest periods between intense training sessions or competitions.
Avoiding “Too Much, Too Soon”: Gradual Progression is Key
In the world of sports, understanding the relationship between workload and injury risk is essential.
Athletes who abruptly increase their training load without allowing their bodies to adapt are more prone to overuse injuries. This is particularly true at the beginning of a season when there’s a rapid change in workload after a period of reduced activity.
Gradual progression, giving your body time to adjust and adapt, is crucial for injury prevention.
The Role of Scapular Stability
Imagine trying to shoot a cannon from an unstable canoe. It’s not going to work well, right? The same principle applies to your shoulder during overhead motions.
The scapula, or shoulder blade, acts as the stable platform for energy transfer from the lower body to the arm.
Weak scapular stabilizing muscles and dysfunctional scapular movement can negatively impact throwing mechanics and increase the risk of injury.
Building Scapular Control: The Foundation for Healthy Shoulders
Strong scapular stabilizing muscles create a solid platform for the shoulder. This platform ensures that the scapula remains stable during throwing motions, allowing efficient energy transfer from the lower body to the arm.
Clinical studies have shown that many throwing athletes, from youth to professional levels, have weak scapular muscles and scapular dyskinesis (dysfunctional movement).
Strengthening these muscles through targeted exercises can enhance scapular control and reduce the risk of shoulder injuries.
The Importance of Eccentric Strength to Prevent Shoulder Injuries
Eccentric forces, particularly during the deceleration phase of overhead
athletic movements, play a crucial role in the overall performance and health of overhead athletes. Eccentric forces refer to the lengthening of muscles under tension, and they are responsible for controlling and decelerating the arm after a powerful throw or serve.
Insufficient eccentric strength can contribute to injuries in the following ways:
Micro Damage: Protecting Your Musculoskeletal System
Repetitive overhead movements place significant stress on the tendons, muscles, and ligaments involved in deceleration.
Over time, this can lead to the accumulation of micro-damage in these structures, surpassing the body’s repair capabilities.
This breakdown of tissues can increase the risk of injuries such as tendon tears or strains.
Eccentric loading can cause changes in the pliability of tissues, especially tendons. Excessive eccentric forces can make tendons stiffer, compromising their ability to absorb and distribute forces effectively.
This stiffness can disrupt the natural load-bearing capacity of tendons, making them more susceptible to injury. To counteract this, maintaining flexibility through regular stretching and mobility exercises is crucial.
Range of Motion: Balancing Mobility and Stability
Repetitive eccentric loading can affect an athlete’s range of motion, particularly in the opposite direction of the eccentric forces.
For example, excessive eccentric loading during the deceleration phase can lead to a decrease in shoulder internal rotation or abduction range.
This limitation in range of motion can increase the risk of shoulder injuries. Incorporating exercises that promote both stability and mobility can help maintain a balanced and functional range of motion.
The Path to Injury Prevention
Preventing shoulder injuries in overhead sports requires a proactive approach. Here are some practical tips for athletes, parents, and coaches:
Listen to Your Body: Pay attention to any warning signs, such as persistent pain or discomfort in the shoulder. If you experience any symptoms, consult with a sports medicine professional to address them early on.
Gradual Progression: Avoid sudden spikes in training load or intensity. Gradually increase your workload and allow your body to adapt and recover. Consistency and patience are key.
Strength and Conditioning: Incorporate strength and conditioning exercises into your training routine. Focus on developing overall strength, including eccentric strength, and improving muscle balance. Consult with a sports rehabilitation expert to design a program tailored to your needs.
Proper Technique: Work with a qualified coach or trainer to ensure you are using correct mechanics and form during overhead movements. Proper technique minimizes stress on the shoulder and optimizes performance.
Rest and Recovery: Prioritize rest days and recovery strategies such as adequate sleep, hydration, and nutrition. Your body needs time to repair and rebuild to stay resilient and injury-free.
Scapular Stabilization Exercises: Incorporate exercises that target scapular stability into your training regimen. These exercises can help improve control and positioning of the scapula, optimizing energy transfer and reducing injury risk.
Remember, injury prevention is a shared responsibility. Athletes, parents, and coaches must work together to create a safe and supportive environment for overhead sports. By implementing these strategies and staying proactive, you can enjoy the game you love while keeping your shoulders healthy and strong.
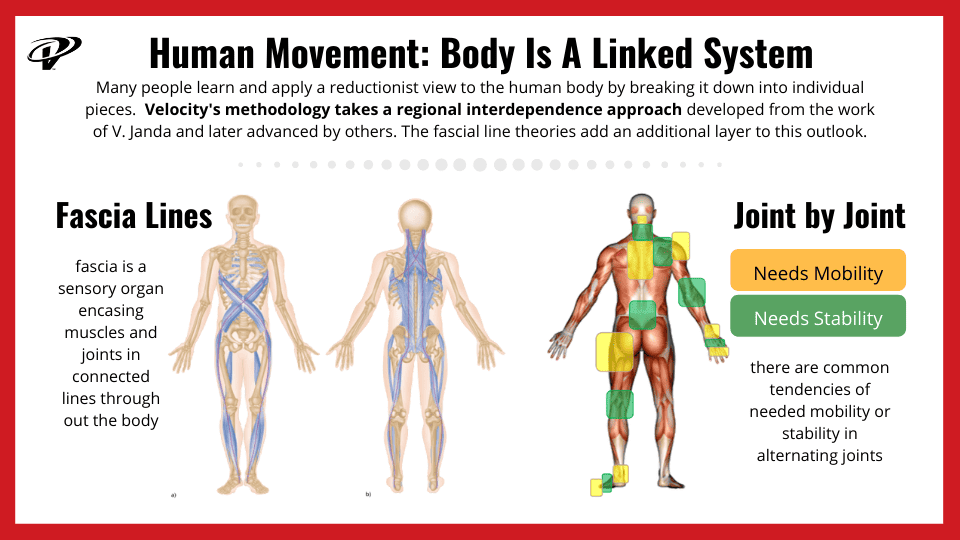
This article aims to provide valuable insights and practical knowledge to athletes and coaches involved in overhead sports. By understanding the body as a linked system, you can optimize performance and minimize the risk of injuries.
Introduction
In overhead sports, such as throwing, serving, or pitching, athletes and coaches are seeking ways to improve performance. Just as importantly, they are trying to reduce ever-present shoulder and arm injuries.
One crucial concept that holds the key to achieving these goals is understanding the body as a linked system.
Its the kinetic chain as a linked system that helps athletes develop roatational velocity in their shoulder and arm. This is critical in sports such as:
Baseball & Softball
Volleyball
Tennis
Cricket
Waterpolo
Team Handball
Javelin
By recognizing the interconnectedness of different parts of the body and how they work together, athletes and coaches can unlock their full potential and unleash optimal performance.
So, let’s delve into the fascinating world of the athletic body as a linked system.
The Kinetic Chain In Overhead Sports
Imagine a symphony orchestra performing a masterpiece. Each musician plays their part, contributing to the harmonious whole.
Similarly, the human body operates as a symphony of movement, with each joint and muscle group playing a specific role in generating and transferring force. This interconnected system is known as the kinetic chain.
In overhead sports, the kinetic chain is particularly crucial. Let’s take throwing a baseball as an example. It all starts with the lower body—your legs and hips generate power and initiate the movement.
In most overhead actions, the arm is only one of the last contributors to velocity. Its the lower body and torse that generate most of the power.
The energy then travels up through your core and transfers to your upper body, finally being released through your arm and hand.
Every joint, from your ankles and knees to your hips, spine, and shoulder, acts as a link in this chain, contributing to the seamless flow of energy.
To optimize performance and reduce injury risk, it’s essential to understand the specific kinetic chain in overhead sports.
By identifying the sequential activation of muscle groups and the critical role of core stability, athletes and coaches can develop targeted training strategies that maximize performance while minimizing stress on individual joints.
Myofascial Lines: The Connective Tissue Web
Beyond the joints and muscles, another essential component of the body’s linked system is the fascia—a complex web of connective tissue that envelops and supports our muscles and organs.
Myofascial lines are the pathways that create the kinetic chain in overhead athletes. They connect multiple joints and muscle groups, allowing for the transmission of forces and energy throughout the body.
Imagine a spider’s web—the tension and interconnectedness between its threads.
Similarly, myofascial lines provide tensional networks within the body, capable of storing and releasing elastic energy during overhead movements. This mechanism is crucial for generating power and optimizing movement efficiency.
In the context of throwing, the myofascial lines act like springs, stretching and storing elastic energy as you load and cock your arm back.
The myofascial lines transfer this stored energy.. When released,it creates a whip-like effect that adds velocity and power to your throw.
Proper utilization of the myofascial lines can also help with deceleration, reducing stress on specific joints during the follow-through phase of an overhead motion. Remember, the summation of forces starts with large muscle groups. However, the arm and shoulder only have small muscles to decelerate.
The large eccentric forces required for decelerating the arm after release are linked through several differnt myofascial chains.
To harness the benefits of myofascial lines, athletes and coaches can incorporate specific exercises and techniques into their training routines.
Dynamic stretching, foam rolling, and mobility drills that target the myofascial lines can enhance their flexibility and elasticity, improving performance and reducing the risk of injuries.
The Joint-by-Joint Approach: Balancing Mobility and Stability
A key principle in understanding the body as a linked system is the joint-by-joint approach. This approach recognizes that different joints have varying needs for mobility and stability to perform optimally. It’s like a delicate dance between providing enough freedom of movement in some joints while ensuring stability and control in others.
Think of the joint-by-joint approach as a blueprint for optimizing movement.
Mobility & Stability Needs In Overhead Athletes
When we look at the kinetic chain in overhead sports certain joints have a bias towards needing mobility. The shoulders, thoracic spine, and hips, require a greater range of motion to generate power and provide mobility.
On the other hand, joints like the elbow, scapular-thoracic, and lumbar spine have a bias towards stability to prevent excessive movement and maintain proper alignment.
When any joint within the kinetic chain lacks the appropriate level of mobility or stability, it can lead to compensations and increased stress on neighboring joints.
For example, limited hip mobility may result in excessive stress on the lumbar spine during a throwing motion. Conversely, insufficient stability in the scapular muscles can lead to increased strain on the rotator cuff muscles.
By understanding the joint-by-joint approach, athletes and coaches can identify and address limitations or imbalances in specific joints. This involves a comprehensive assessment of each joint’s mobility, stability, and movement patterns. Based on the assessment findings, targeted interventions can be implemented to restore balance and optimize joint function.
For instance, if an athlete demonstrates restricted ankle mobility, exercises and stretches that improve ankle range of motion can be incorporated into their training program.
Additionally, incorporating strength and stability exercises for the shoulder joint can enhance its ability to withstand the demands of overhead movements.
The joint-by-joint approach provides a framework for designing individualized training programs that address the unique needs of each athlete. By promoting optimal mobility and stability in all relevant joints, athletes can move efficiently, generate power effectively, and minimize the risk of injuries.
Conclusion
Understanding the kinetic chain in overhead sports is paramount for optimizing performance and reducing the risk of injuries.
By recognizing the intricate interplay of the kinetic chain, myofascial lines, and the joint-by-joint approach, you can unlock your full potential and excel in your chosen sport.
Remember, the body is not just a collection of isolated parts; it operates as a dynamic and interconnected system. If you move beyond isolated strengthening, you can enhance your performance and maintain a healthy, resilient body.
To implement these concepts effectively, seek guidance from qualified professionals such as Velocity’s performance coaches and sports rehab specialists. They provide tailored training programs, assessment techniques, and interventions to help you optimize your body’s linked system for overhead sports.
So, embrace the idea of the body as a linked system, and unlock your true potential as an overhead athlete. With knowledge, training, and a holistic approach, you can soar to new heights and achieve your athletic goals while keeping injuries at bay.
Are you a hardcore athlete yearning to hit the field, track, or court again after a pesky hamstring injury? We’ve got your back (and hamstrings)!
It’s time to turn your setback into a heroic comeback. With the right game plan and determination, you’ll be sprinting toward victory in no time.
In this guide, we’ll equip you with a toolkit for returning to sport after a hamstring injury. So, lace up your sneakers and let’s embark on this exciting journey!
The Road to Recovery: Preparing for the Comeback
The road to glory starts with healing the hamstring. Before diving into action, ensure you have the green light from a sports physician or physical therapist. With the injury phase behind you, it’s time to focus on reclaiming your athletic skills.
And this means a lot more than just resting until it heals and going back to sport. Inadequate and incomplete rehabilitation is considered a major risk factor and why previous hamstring strain is the largest risk factor for future strains (Tokutake 2018).
Rebuilding Tissue and Restoring Length: Flexible and Strong
One of the most critical aspects of returning to sport after a hamstring injury is ensuring the hamstring muscles are both flexible and strong.
Rebuilding damaged tissue and restoring optimal length are essential for regaining full function and preventing future injuries.
Here’s why focusing on these aspects is vital for your triumphant comeback:
Rebuilding Tissue: Healing for Resilience
When a hamstring injury occurs, it often results in damage to the muscle fibers and surrounding connective tissues.
These tissues need time to heal properly and regain their resilience. Engaging in controlled and progressive exercises is key to promoting healing while minimizing the risk of re-injury.
Rebuilding the muscle tissue means building strength so the healing fibers align properly.
Example Exercises:
Isometric Contractions: Perform isometric hamstring contractions by placing your foot on a stable surface and gently pushing down against it for a few seconds. Isometric exercises stimulate the healing process without putting excessive strain on the muscles.
Eccentric Hamstring Curls: Lower the leg slowly during a hamstring curl, focusing on the lengthening phase. Eccentric exercises help rebuild tissue strength while reducing the risk of excessive tension on the muscles.
Restoring Length: Flexibility for Optimal Function
Following a hamstring injury, scar tissue may form, leading to decreased muscle flexibility.
Restoring optimal muscle length is crucial for improving overall function, preventing compensatory movements, and reducing the risk of future injuries.
Example Exercises:
Active Stretching: Engage in active hamstring stretching by lying on your back, raising one leg, and gently pulling it towards your chest. Active stretches help lengthen the muscles while promoting blood flow to the area.
Dynamic Lunges: Incorporate dynamic lunges, emphasizing a deep stretch in the hamstrings, as part of your warm-up routine. Dynamic stretching prepares the muscles for more intense movements while gradually increasing their flexibility.
Stretching, self-myofascial release, and professional soft tissue work are all part of restoring your full range of motion after a hamstring injury.
Strengthening the Posterior Chain and Core: Powerhouse Players
Unlocking your full athletic potential after a hamstring injury requires tapping into the strength of your posterior chain and core.
These powerhouse players play a vital role in sprinting, jumping, and overall sports performance. Here’s why focusing on these muscle groups is crucial for your triumphant return:
Strengthening the Posterior Chain: Engine of Power
The posterior chain, consists of the facia and msucles of the calves, hamstrings, glutes, and lower back. They are responsible for generating power during explosive movements like sprinting and jumping.
By strengthening these muscles, you’ll enhance your ability to accelerate, decelerate, and change direction effectively.
You’ll also make sure your every part of the chain is contributing and not forcing to much load on just the hamstrings.
Example Exercises:
Romanian Deadlifts: This classic exercise targets the hamstrings and glutes, promoting strength and stability in the posterior chain. Keep your back straight, and hinge at the hips while lowering the weights down your shins.
Kettlebell Swings: A dynamic exercise that engages the hamstrings and glutes through explosive hip extension. Hinge at the hips and use the force generated by your hips to swing the kettlebell forward.
Back Extensions: Targeting the lower back muscles, back extensions strengthen the erector spinae, promoting stability and preventing lower back injuries.
Core and Pelvic Stability: The Epicenter of Performance
A strong and stable core is the epicenter of athletic performance. It provides a solid foundation for efficient movement and transfers power from the lower body to the upper body and vice versa.
Moreover, a stable pelvis is crucial for optimal biomechanics during dynamic movements. If your pelvis is shifting out of control in sprinting and sports movements, excessive stress can be placed on your hamstrings.
Example Exercises:
Planks Variations: Planks are a classic core exercise that targets the entire core, including the rectus abdominis, obliques, and transverse abdominis. Try plank variations like side planks and plank with leg lifts for a more challenging workout.
Glute Bridges with Marching: By lifting one foot off the ground during a glute bridge, you challenge pelvic stability while activating the hip abductors. This exercise helps address any imbalances and ensures proper alignment during movement.
Russian Twists: This rotational core exercise engages the obliques and transverse abdominis. Use a medicine ball or weight to increase the intensity.
Remember, consistency and proper form are key. Gradually increase the intensity of your workouts, and don’t forget to allow for adequate rest and recovery. By focusing on strengthening the posterior chain and core, you’ll lay a strong foundation for your triumphant return to sport and a future filled with athletic excellence.
Incorporating Speed and Agility: The Need for Speed
Speed and agility are the bread and butter of athletic performance, and mastering these skills is essential for a triumphant return to sport after a hamstring injury.
By incorporating speed-specific drills and plyometric exercises into your training, you’ll elevate your game and leave your competitors in the dust.
The Demands of Full-Speed Sprinting on Hamstring Muscles
Sprinting at full speed places some of the highest demands on the muscles of the body, particularly the hamstrings. (Learn more about the science of speed mechanics here)These powerful muscles are crucial for propelling the body forward during explosive movements, such as sprinting.
However, it’s important to understand that while various exercises and drills can help prepare the hamstrings, nothing fully replicates the intensity and stress that sprinting at top speed places on these muscles.
During a full-speed sprint, the hamstrings undergo rapid and forceful contractions to propel the body forward with maximum velocity.
They are responsible for extending the hip and flexing the knee, generating the necessary power to cover ground rapidly.
Additionally, the hamstrings play a vital role in deceleration, eccentrically controlling the leg’s forward motion during the swing phase to prepare for the next stride.
Without specific exposure to full-speed sprints, the hamstrings may not be fully prepared for the explosive power and high-intensity efforts required during competition.
Incorporating full-speed sprinting into your training regimen, under the guidance of a skilled coach or physical therapist, can help bridge the gap between strength training and on-field performance.
Mastering Speed: Ignite Your Explosive Power
In sports, speed is often the difference between victory and defeat.
Speed drills help you maximize your acceleration, top-end speed, and agility, ensuring you’re always one step ahead of the game.
Example Sprint Drills:
A-Skips: This drill focuses on proper knee drive and foot dorsiflexion, training your body to maintain an upright posture and develop powerful strides.
Dribbles: Quick, short strides performed at high frequency, mimicking the fast turnover needed for rapid acceleration.
Fast Leg Drills: Rapidly alternating high knee lifts with each step, enhancing hip flexor strength and improving stride frequency.
Posterior Focused Speed Drills: Restoring Hamstring Function For Sprinting
When it comes to speed, your posterior chain muscles play a starring role and the hamstrings need to be ready.
Strengthening and activating these muscles in specific drills will not only optimize your sprinting performance but also reduce the risk of future hamstring injuries.
Example Posterior Speed Drills:
Straight Leg Gallops: Pull forward with exaggerated strides, focusing on extending the hip backward with each step. This drill targets the hamstrings and glutes for the high speed contractions in sprinting mechanics.
Straight Leg Shuffles: Maintain a straight leg during forward shuffles, engaging the glutes and hamstrings to pull back at the ground explosively.
Straight Leg Sprints and Bounds: Emphasize hip flexion and pulling backwards during sprints and bounds, engaging the posterior chain for maximum power output. For runs you focus on speed and for bounds you focus on getting long strides with more air time.
Proper Butt Kick/Thigh Pop Exercises: Execute a “butt kick” action, emphasizing pulling the heel under the glute, while focusing on bringing the thigh parallel to the ground. These drills reinforce the importance of proper hip extension in sprinting.
Gradual Progression to Full-Speed Sprinting: Patience Pays Off
As you approach the pinnacle of your return-to-sport journey, gradual progression becomes the key to unlocking your full potential.
While you may be eager to unleash your full speed, it’s essential to approach it with patience and a well-structured plan.
Why Gradual Progression Matters After Hamstring Injury
Gradual progression allows your body to adapt and build resilience to the demands of full-speed sprinting.
By respecting the healing process and respecting the guidelines set by your physical therapist, you’ll mitigate the risk of re-injury and lay a solid foundation for long-term success.
Studies have shown that a progressive return-to-sport program leads to better outcomes, reducing the risk of re-injury and promoting a smoother transition back to full competition (Ishøi et al., 2018).
Step-by-Step Outline for Gradual Progression
1: Foundation Building
Start with low-impact exercises, such as stationary cycling or pool workouts, to maintain cardiovascular fitness without excessive stress on the hamstring.
Engage in gentle static and dynamic stretching to improve flexibility and reduce muscle tension.
2: Low-Speed Drills
Introduce low-speed drills like jogging, skipping, and ankle dribbles to ease your body back into dynamic movements.
Continue to focus on core stability and posterior chain activation during these drills.
3: Controlled Acceleration
Gradually increase your pace with controlled acceleration drills, such as build-up sprints or gradual accelerations over short distances.
Emphasize proper sprint mechanics and form during these drills.
During this phase progressively use the posterior chain speed drills to prepare the hamstrings.
4: Sub-Maximal Sprints
Gradually build to fast calf and knee dribbles.
Execute sub-maximal sprints at around 60-70% of your maximum effort.
Pay attention to any signs of discomfort or fatigue and adjust your intensity accordingly.
5: Full-Speed Exposure
Incorporate full-speed sprints in a controlled environment, such as on a track or field, under the guidance of your physical therapist or coach.
Begin with shorter distances, such as 20-30 meters, and gradually progress to longer sprints.
Continue the posterior chain speed drills as part of your warm-up.
Full Speed Sprints in Practice: Prevent Hamstring Strains Through Exposure
Research suggests that incorporating some exposure to full-speed sprints during practice can help prevent hamstring injuries. By gradually integrating high-speed movements into your training regimen, your hamstring muscles adapt and become better equipped to handle the demands of sports competition.
A study published in the Scandinavian Journal of Medicine & Science in Sports found that athletes who performed short, maximal sprints during practice had a lower risk of hamstring injuries compared to those who only trained at sub-maximal intensities (van der Horst et al., 2015).
With a gradual progression plan, you’ll develop the strength, flexibility, and confidence needed to sprint at full speed without fear. Trust the process, believe in your body’s ability to recover, and remember that your journey to greatness is defined by resilience, determination, and patience.
Conclusion: The Epic Triumph
Congratulations, Hamstring Hero! You’ve come a long way on your journey to reclaiming your speed. With determination, dedication, and a strategic plan, you’ve transformed setbacks into stepping stones, turning your hamstring injury into a triumphant comeback story.
As you prepare to step back onto the field, track, or court, remember these key takeaways that have paved the way for your epic triumph:
TL;DR – Your Key Takeaways
Rebuilding tissue and restoring hamstring length is essential for healing and regaining flexibility.
Strengthening the posterior chain and core provides a solid foundation for explosive performance and stability.
Speed drills prepare your hamstrings for the high demands of top-end speed,.
Gradual progression is crucial for building resilience and minimizing the risk of re-injury.
Full-speed exposure during practice helps prevent hamstring injuries and prepares you for competition.
Your return to sport after a hamstring injury is not just a mere comeback; it’s a testament to the hero within you.
You’ve navigated the path of resilience, endured the challenges of recovery, and emerged stronger than ever before.
As you sprint towards your goals, remember to cherish each milestone and celebrate your victories along the way. There will likely be frustrations and small setbacks, but that’s part of the stroy.
So, Hamstring Hero, the field awaits you with open arms. Embrace the epic triumph that awaits, and unleash your full potential on your quest for athletic excellence. It’s time to claim your rightful place as a true champion!
Unleash Your Athletic Potential and Rediscover Your Inner Champion!